Editing Purchasing Card Batch Invoices
Overview
Users can make limited changes to purchasing card batch invoices after they have been imported from the purchasing card file.
Purchasing card informational invoices are not editable by default, they must be made editable. This is done during the purchasing card import process by selecting the Maintain Invoices check box on page 3 of the Import Accounts Payable Purchasing Card Invoices wizard (hereafter referred to as “the import wizard”) and completing the import wizard.
Note: In this document, the words editable and maintainable are synonymous and refer to the user’s ability to change certain field values in the Invoice Batch entry page.
Users can then open the invoices via the Invoice Batch entry page and make any necessary changes.
Keep in mind that only certain fields are maintainable and many of the features normally available to the Invoice Batch entry page are not available in maintain mode.
Once a user has made and saved all the necessary invoice changes, the batch must be converted from its maintainable state back to a normal purchasing card batch. When this is completed, all of the features and functionality normally available to the Invoice Batch entry page are restored.
At this point, should a user find that additional invoice changes are necessary, there is a feature that allows the user to return a converted batch back into a maintainable batch, so that additional changes can then be made.
All of this is explained in detail in the following Step-by-Step section.
Step-by-Step: Editing Purchasing Card Batch Invoices
- Open the Invoice Batch List page: Financial Management > Accounts Payable > Invoice Entry Batches.
- Click the Import Purchasing Card button at the bottom of the page to launch the import wizard, and then fill in the first two pages as you normally would for a purchasing card batch import.
-
On page 3 of the wizard, do the following:
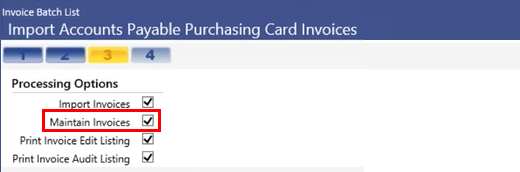
- Select the Import Invoices check box.
-
Select the new Maintain Invoices check box. Selecting this check box makes the invoices editable.
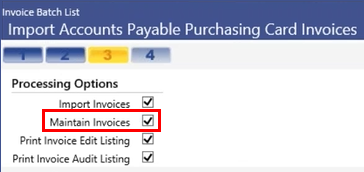
Note: The Maintain Invoices check box is cleared by default. When it is cleared, the batch is imported as a normal purchasing card batch.
- Click Finish to advance to the next page of the wizard.
Note: If you intend to make the batch maintainable but accidentally complete the import without selecting the Maintain Invoices check box, you can simply delete the batch and start over.
-
On page 4 of the wizard, note the AP invoice batch number that was created and then return to the Invoice Batch List page by clicking the Invoice Batch List breadcrumb in the upper left-hand corner of the wizard.
-
The Invoice Batch List page will open. In the grid, locate and click on the purchasing card invoice batch you created in the previous step.
 Show me.
 -
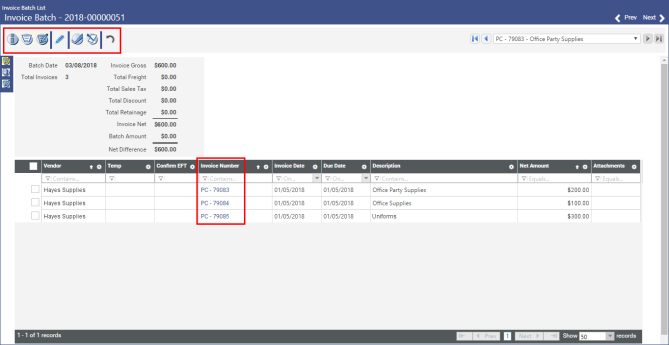
The selected batch will open via the Invoice Batch page. The grid lists all of the associated invoices. Each of these can be opened individually for editing.
Show me. For information about how the Invoice Batch page in Maintain mode is different than a normal invoice batch, click
here. In the Invoice Batch grid, select an invoice you would like to change by clicking on its Invoice Number.
-
The invoice will open via the Invoice Batch page. Now you can edit the invoice.
Keep in mind, though, that there are limitations on what can be changed. Only the following fields can be modified:
- G/L Account
- Project
- Vendor
- Invoice Description
- Item Description
- Invoice Date
- Due Date
- Add PO Items
- Assign Contract number (purchasing contract)
- Select Contract Items (commodity contracts)
- Invoice Amount
After you have made all your edits, click the Save button at the bottom of the page.
-
At this point, you’re ready to create the purchasing card import invoice. To do this, click the
 Create Purchasing Card Import Invoice icon.
 -
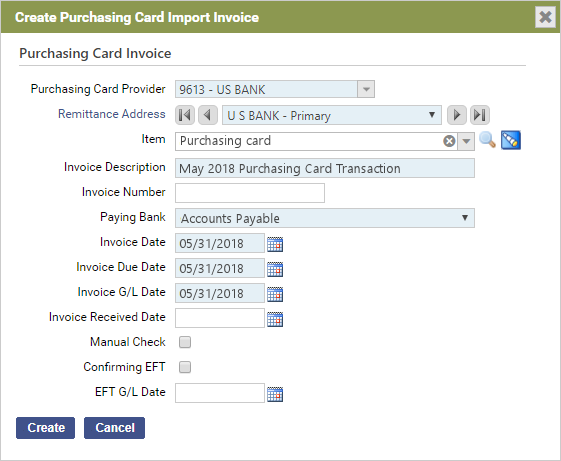
The Create Purchasing Card Import Invoice pop-up window will open. The information in this window represents the invoice you will ultimately use to pay the purchasing card provider. Entry fields in this window are populated automatically based on values entered via the import wizard.
Review the field values and make any necessary changes.
Click Create.
-
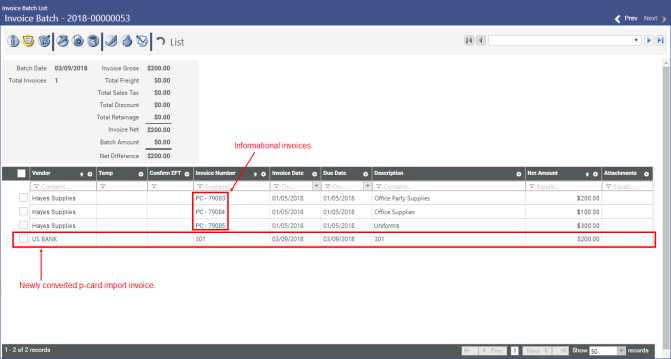
The Invoice Batch page will reopen with your newly converted purchasing card import invoice listed in the grid.
-
The purchasing card import invoice will open via the Invoice Batch page. At this point, the workflow icons and other functionality normally associated with this page have all been restored, because the purchasing card import invoice is no longer in maintain mode, but is now a normal invoice subject to normal processing.
-
If on reviewing the invoice you discover an error that was made during the editing process (or a previously existing error that was missed during the editing process), you can simply “reverse” the conversion, return the invoice to its previous maintainable state.
To do this, simply click the Reverse Purchasing Card
 icon.
icon. Note: Reversing a converted purchasing card import invoice simply returns invoice to a maintainable state, it does not reverse the changes made when it was last maintained. Those changes are retained unless you manually change them again.
An action confirmation pop-window will appear; click OK to continue.
You can now make the desired changes, save them, and then repeat step 10 above, i.e., click the Create Purchasing Card Import Invoice
icon to convert the maintainable purchasing card batch back to a regular purchasing card batch.

 and Reverse Purchasing Card
  . These buttons allow you to convert an editable batch to a normal batch and reverse a purchasing card batch respectively. These functions are described in detail below.
Notice that the grid contains two different types of invoices: 1) the actual purchasing card import invoice, i.e., the invoice you will pay to the purchasing card provider, and 2) one or more informational invoices, which are simply records of the transactions that make up the actual invoice. Informational invoices are just for your reference, providing information about what was purchased, from whom it was purchased, to which G/L account it was charged, etc.
Open the newly converted purchasing card import invoice.